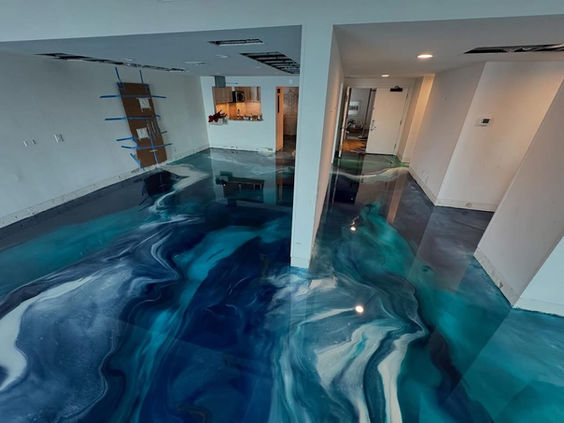
Luxurious Designer Metallic Epoxy Customized To Suit Your Aesthetic
What Tru-Grit Brings To The Table:
Stunning 3D Effect – Metallic pigments create a unique, glossy, and dynamic appearance.
High-Performance Durability – 100% solid epoxy resists abrasions, chemicals, and stains.
Waterproof & Long-Lasting – Withstands heavy foot and vehicle traffic with ease.
Low Maintenance – Easy to clean while maintaining its vibrant, high-gloss finish.

Pay Over Time With Monthly Financing

Benefits and Features Of This System
Why Choose Designer 3-D Metallic Epoxy Floors for Your Florida Garage or Business?
If you’re looking to turn your garage, home interior, or commercial space into a showpiece, our Tru-Flow Designer 3-D Metallic Epoxy Flooring System is the perfect solution. Combining artistic beauty with industrial strength, this system offers a one-of-a-kind finish that performs as impressively as it looks. Top five reasons to consider a metallic epoxy floor in Florida.
Swirls of pigment create a three-dimensional, liquid-metal look that can mimic marble, lava, water, or abstract art. It's fully customizable, giving homeowners and business owners total control over color combinations and design patterns.
Durable Enough for High-Traffic Areas
Resists Florida’s Heat, Humidity, and UV Exposure ensuring your floor won’t yellow, bubble, or break down in the summer heat.
Seamless, Sanitary, and Easy to Clean due to no grout lines and hard-to-clean joints. The optional satin or gloss finish also adds a level of elegance while resisting scratches and stains.
Long-Term Value with Minimal Maintenance

Welcome to Tru-Grit Flooring — Central Florida’s trusted team for premium epoxy and polyaspartic floor coating solutions.


What are the Benefits of this Metallic Coatings in Central Florida?
Looking for a durable and eye-catching flooring option for your home or business? Our 3-D 100% solid metallic epoxy flooring creates a stunning, glossy surface with a unique depth and movement effect thanks to its special metallic pigments. This tough, waterproof flooring resists abrasions, chemicals, stains, and heavy foot or vehicle traffic—making it perfect for high-traffic areas that need both style and strength.

Designer 3-D Metallic Epoxy Flooring System Process
STEP ONE | Surface Preparation:

This crucial step ensures the success of a new coating on concrete by removing contaminants and opening surface pores for better adhesion. We use mechanical grinding to improve adhesion, enhance safety, and achieve long-lasting, high-quality finishes.
Vacuuming dust and debris during surface preparation is essential to prevent issues like peeling or delamination. It ensures the surface is clean and free of loose particles that could interfere with bonding.
STEP TWO | Base Coat Application:
We apply a 10 MIL (thousandths of an inch) thick Tru-Flow Moisture Vapor Barrier Epoxy Basecoat to prevent moisture-related issues. This basecoat acts as a shield against moisture vapor transmission from the underlying concrete, ensuring that the flooring system remains unaffected by moisture. This makes it a reliable choice for spaces prone to humidity or water exposure.
STEP THREE | Imperfection Stabilization:
The second day begins with a thorough inspection to address any imperfections that may have been missed during the initial crack repairs and grinding. Achieving a completely smooth and even surface is essential to ensure that the subsequent layers adhere correctly and result in a flawless finish.
STEP FOUR | Metallic Epoxy Application:
We apply a 35-45 MIL (thousandths of an inch) thick layer of Tru-Flow Designer Metallic Epoxy, enriched with metallic pigments. This step gives the flooring its distinctive three-dimensional effect. As the epoxy cures, it forms a glossy and reflective surface that mimics the appearance of depth and texture, providing a unique visual experience.
STEP FIVE | 3-D Dispersion Pigments:
The integration of Tru 3-D Dispersion Pigments is pivotal for achieving the mesmerizing metallic effect. These pigments are carefully mixed into the epoxy, creating a distinctive pattern that adds complexity and character to the floor's appearance. The use of multiple colors enhances the depth and visual interest of the design.
STEP SIX | First Top Coat Application:
We apply a 4 MIL thick layer of Tru Alpha High Wear Polyurea, either in satin or gloss finish. This protective coat enhances the flooring's durability, making it resistant to wear, chemicals, and potential damage. The choice between a satin or gloss finish allows for some customization of the final appearance, with gloss lending a reflective shine and satin providing a more subdued elegance.

STEP SEVEN | Final Top Coat Application:
On the final day, we apply another 4 MIL layer of Tru Alpha High Wear Polyurea to fortify the flooring's longevity and resilience. This dual application of the protective topcoat ensures that the flooring system is well-prepared to withstand the rigors of daily use, especially in high-traffic areas.
STEP EIGHT | Final Inspection and Curing Time:
After the final application, allow a full 48 hours for the flooring to dry completely before subjecting it to both light and heavy traffic. This essential curing period ensures the optimal durability and longevity of the metallic epoxy system, safeguarding its exquisite finish and resilience. During this crucial timeframe, it's advisable to avoid any activities that might compromise the flooring's integrity, allowing the installation to reach its full potential. Click here to learn more about our pricing.

Customize Your Floor By Choosing Your Desired Pigments
At Tru-Grit, selecting the right Tru 3-D Dispersion Pigments is a key part of creating a truly custom metallic epoxy floor. These pigments are responsible for the swirling, multi-dimensional effects that give each floor its depth, movement, and luxurious appearance. Choosing the right combination of colors can completely transform the mood and style of your space.
Not sure where to start? Our knowledgeable sales team is here to help you explore your options and guide you through the selection process. Whether you want something bold and dramatic or subtle and refined, we’ll help you find the perfect pigments to match your vision.
View our Tru 3-D Dispersion Pigment options and start customizing your floor today by clicking the link below!


